Posts

Showing posts from December, 2021

Toolkit 2: Jetpack Jones - Modelling The Brow

Image
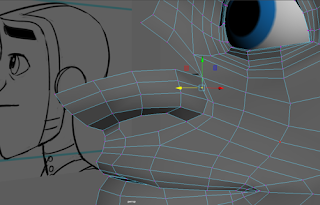
 Today I continued on with the video tutorials in order to model the characters brow. In order to do this I first had to make room for additional geometry which would run through the jaw of the character, all the way up to his forehead. I found when making this change that some of my geometry looked out of place when referencing Alan's version. I spent time reshuffling parts of the face around in order to match how the character should look. I found that my characters nose was far too pointed, which lead to there being a crease in the middle of the face. I spaced out the placement of the vertexes around this area in order to give it a more rounded look. I used soft select in order to make the characters cheeks. After I modelled the brow to fit the characters likeness, I then reattached the forehead. This was a simple process of snapping the vertex’s to the appropriate part and then merging them. Before finishing I went around with the relax tool one more time now that the new geome

Toolkit 2: Jetpack Jones - Finishing The Nose Modelling

Image
 Today I continued with modelling the characters nose. It was important that the nose remains a equal spacing so that the model is supported when in smooth preview. Once the basic shape of the nose had been modelled, I then mirrored the model in order to see how the full nose would look. I found that it was far too pointy and needed rounding out. After adjusting the vertices on the nose in order to round it out more, I then had to improve upon the characters nostrils. This was done by filling in the nostrils and then extruding up into the nose. I found that now that I had completed the head geometry, I was much more confident with modelling the nose. I now understood how the geometry should be presented and so was able to make a cleaner model much more quickly .

Toolkit 2: Jetpack Jones - Finishing The Eye And Beginning To Model The Nose

Image
 Today I finished cleaning up the eye and began modelling the nose. I had to shuffle around some of the points above the lips in order to make sure the nose would be placed in the correct space.

Toolkit 2: Jetpack Jones - Modelling The Eye

Image
 Today I began modelling the area around the eye. Before modelling this however I firstly had to line the eye up with the eye socket.    I could then move the vertexes to surround the eye. After sorting out all of the geometry surrounding the eye, I then had to extrude out around the edge of the eye in order to make the eyelid.

Toolkit 2: Jet Pack Jones - Continuing To Model The Mouth

Image
 Today I continued on with the video tutorial in order to complete the lips for Jetpack Jones. I added in additional edge loops in order to support the lower lip. By adding in additional edge loops, it required me to have to reshuffle a lot of the geometry already put in place. I could start to build the shape of the characters face more because of this. I then mirrored the model in order to get an idea of what the model looked like as a whole. I found that the lips looked far too thick and so used the mirror tool in order to make them thinner. I had a bit of a problem surrounding the upper jaw of the model. The jaw would dip in rather than being flat, making the characters face look less natural. I spent time sorting out the placement of certain vertexes in order to fix this problem. This problem occurred due to me moving around too many parts at once and was a simple matter of sitting and cleaning up the model. After doing this I was able to continue on modelling the mouth. I have ma

Toolkit 2: Jetpack Jones

Image
 Today I continued from where I left off modelling the characters head. The main problem I had with the model so far was that it was a combination of the video version of the model and the version learnt from physical lessons, which was rushed in comparison. This left me with a model which was along the right lines of what it needed to be however certain parts were out of place.  For this reason I took the time to clean up the model, using the video version as reference.  After moving around all of the edges, I then had to add additional geometry in the back of the head. This was done by using the multi cut tool and then deleting any unnecessary edges.  I need to take time to clean up mesh so that no issues arise when adding additional detail. I followed the video's advice explaining to make sure lines stay parallel and run naturally around the face. After spending time making sure the model was evenly spaced, I then continued with the tutorial to the mouth, making stage. This requ

Improvements Based On Crit + Final Version Of Animation + Personal Reflection

Image
After hearing about Simons concerns surrounding our animation, with it being too long and that the final scene looks off, today I decided to improve up this. The most pressing issue was the time in which the animation currently sits at, 3:10, which is 1:10 above the time specified on the brief (2:00). Originally I thought that this would not pose as much of a problem, as it shows that I have gone over and above in order to create an animation. However I now realise that I have been given at time limit and by going past it shows that I have not fully understood the brief. This would not be acceptable if done on a professional production, with a time specified by the client and so why would this be any different.  My reason for going so far past the time was that I wanted my main contribution to the project to be done to the best of my ability. This lead to me adding in additional actions to Moom in order to better fit the brief of a comedy. This had the effect I wanted, however cause th

Collaboration Crit And Art Of

Image
 Today as a group, we presented our project to the course. We made a Google slides presentation containing our groups art of. I have linked this below and also uploaded screenshots as examples. I was excited to present as I was proud of the work in which we have produced for this project and feel that our end result matches the brief specifications.  Link Funny Bones Presentation After presenting our slide and explaining the processes we each went through in order to complete the work, we then showed off the final animation.  After showing off our animation, the main criticism Simon had towards it, was that it was 3:10 rather than the specified 2 minutes. This was a problem as it meant we had not officially met the brief. We would have to reduce the animation to 2:20 at the maximum which is 10% in order to meet the brief. However this was not the worse problem to have in the world as we had put in the work, now all we had to do was trim it down. This could be done by editing out certai

Final Animation Before Crit + Reflection On The Animation Process

Image
  Below is the final animation of "When Not To....Go Outside" I found the animation process to be a very interesting experience. As a group we all focused on different parts of the animation in order to get it done, Emily and Marta focused on 2D and 3D, while I animated in 3D. In order to make sure the whole animation was completed on time, I started it immediately after finishing the pre-viz (this was roughly 3 weeks). While Emily was in the process of completing the final models, I began animating the scenes in order, using the Pre-viz as a guide.   At first I struggled to get the timing of the character right. Every time I attempted to animate the scene, it would look unnatural and too quick. This was due to the lack of anticipation, which I learnt helped make the animation look a lot more fluid. I tried to include this as much as I could throughout the animation, however their are still parts which would benefit from this. I found it hard to visualize the scenes, even wit

Finishing Animation

Image
 Today I went through the list of changes I needed to make and applied them to my animation. Most required me to update certain objects in the scene, such as the background or house, as they had been improved upon in later scenes. I also added extra elements, such as cars driving past, in order to make the world seem lived in. Its little details like that which really add a lot to an overall shot.  After cleaning up the animation, it was now ready for sounds to be added. I imported the video into Adobe Audition and began adding the same sound effects found in the pre-viz, in order to block out what I already had. I found that some sounds did not fit the finished animation and so I changed them. Since I changed how some of the scene's played out, I had to add additional sound effects in the appropriate areas. I spent a lot of time finding the right sound and tried out multiple until it was perfect.  I really like how the audio turned out and feel it adds SO much character to the ani

Animation Test Full

Image
 After finishing all of the animation, I then put it all together to check see how all of the elements work together before constructing the final version.  I wrote down a list of changes which needed to be made for the final animation: At a shot at the beginning of Moom's house, this will establish the audiences place in the world Scene 1 (Shot 2, Moom Hammering) Make Moom Smooth  Scene 1 (Shot 7, Ball Bouncing Around House) Make Change the background to the final background Scene 1 (Shot 8, Ball Bouncing On The Trampoline) Change the background world to the final version  Scene 1 (Shot 9, God Using Computer) Change the colours of the computer, chairs and Texture God Scene 1 ( Shot 10, God Walking) Texture God and change the colour of the computer in the background Scene 1 (Shot 11, Plug Falling Out Of  Wall) Plugs prongs are left behind when the plug leaves the wall Scene 1 (Shot 12, No Gravity) I have managed to complete this scene however, whenever I try to add it to the Premie

Charcter Bible: Designing The Time Keeper + Turn-Around

Image
 The timekeeper lives at the edge of time and checks to insure the timeline remains intact. Although they are just doing their job, to the heroes they will appear to be an antagonist. The heroes will think this as the time keeper has the same psychedelic look as the tears which are appearing in the world.  The timekeeper will be made up of a combination of interesting shapes and patterns. They will have this appearance in order to be able to travel between timelines and survive without damaging the timeline. They will need to have a menacing look to their design, in order to make it believable that the heroes (and audience)  think he is the villain.  With this in mind I began designing the character until I was happy with the final version.  I really wanted the Time Keeper motives to remain anonymise for the majority of the story and so tried to reflect this in its design. I tried to create the effect that the character is an extension of the psychedelic mist which surround it. By doin