Posts

Showing posts from March, 2022

Premise: Character Expression Sheet
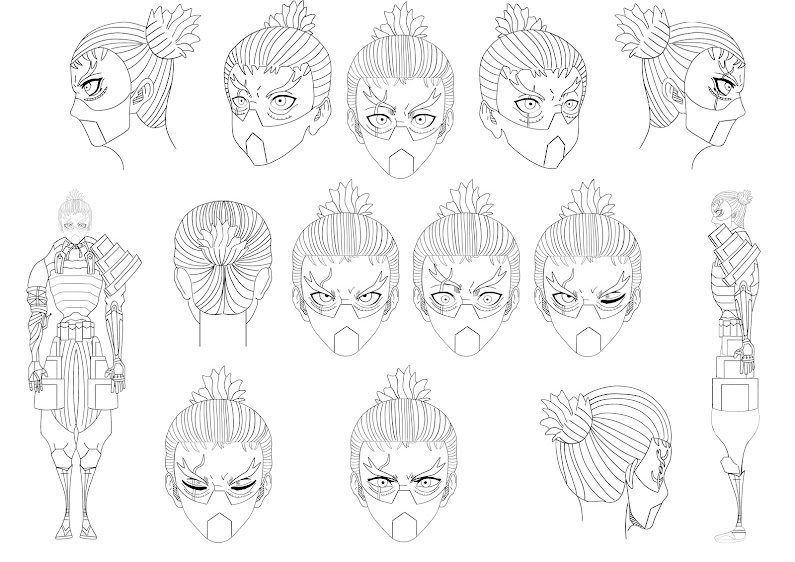
Image
 Today I drew a character expression sheet for my main character. I drew different emotions I felt my character would go through throughout the animation. This will be useful when it comes to constructing the final storyboard as well as modelling my character later on.  I have only completed an expression sheet for this character as the other one does not show any emotion as they have become more machine than man. This idea is meant to contrast against the human character. 

Premise: Additional Concept Art For Environment

Image
 From my orthographs I managed to construct the area leading up to the Japanese palace. In the animation the characters will start lower down on the mountain and gradually make their way to the top to reveal the palace as the backdrop for their final fight.  I drew a very basic floorplan which then allowed me to pinpoint where everything is in the environment. I could then draw the different parts of the environment at different angles to show how they would look in the animation. 

Premise: Japanese Environment Orthographs

Image
 Today I completed the orthographs of objects  which will be in the environment the characters will traverse.  I was struggling to visualize the environment in full and so decided to break up all the important elements which I knew existed from my concept art. I could then use these drawings to help build up additional drawings for my environment and use the orthographs later when it comes to modelling in 3D Below is the side profile of the area leading up to the entrance of the Japanese palace. 

Premise: Final Character Designs + Turn-a-rounds

Image
 Today I completed the final version of both character turnaround in both linework and colour.  I tried to make each side of the character as accurate as possible in order to ensure I have the best reference when it comes to modelling in 3D. I found it hard to draw the side profile for both characters, however the cyberpunk character was particularly hard due to his ribcage design. It took many attempts to make this look right however was hard due to the characters exaggerated proportions. I eventually managed to draw a version which is as close enough to the front profile to model from.  As I revisited the characters design I decided to change the prosthetic arm to make it look more personal to my character. I made the bottom of the arm much thicker as I want to include it in the combat sequence and felt the original looked far too brittle to look practical. I prefer how this version puts a stronger emphasis on the wooden part of the arm which is meant to be hand crafted...

Life Drawing 24/03/22

Image
 Todays life drawing lesson started with a 40 minute demonstration on how to draw faces. This was useful and I tried to apply the ideas learnt to the following drawings. 

Toolkit 2: Introduction To Substance Painter

Image
 Started by importing the FBX file into Maya. The object was coloured in a specific way so that when its imported into Substance Painter the objects will be grouped.  ID pass - colour which have been assigned to the vertices in Maya. Create shades for big areas, ID pass allows for more detail in the colouring later on. This is done by applying a shader to an object. right click select the vertices, click on mesh display and then paint vertex. This can be done as many times as you want and will add more detail on the object in substance painter. The problem with adding more vertexes is their will be a fade between the two. To fix this problem instead of picking the vertexes, select the faces instead.  Make sure when you export you tick embed media.  Alt + Shift = Snap to different orthographic angles.  B = Cycle through different passes M = Return back to basic look.  After all of the materials have been assigned you can them go back through and adjust the s...

Premise: Reflecting Upon Ideas Of Cyberpunk World

Image
 I completed some initial drawing of what the cyberpunk city could look like. I tried to consider the overpopulation factor throughout the drawing. I really like the middle building which points to the sky in a beam of light. I also tried to include the narrative that the city is alive by making the building on the bottom right out of a helix shape, much like a strand of DNA.  I was then going to continue along with this idea by drawing more building and layering them in a way  which looks like the image below. This was translate the sheer volume of buildings in the city.  Although I like this idea as every building is unique with its own personality, I feel it would be far too much work for the type of project I am doing. As my project focus is the fight scene, to spent so much time on objects which will only appear in the distance seems like a bad way to spend my time.  I could however solve this issue by making the city in the background a matte painting, how...

Toolkit 2: Hard Surface Sculpting In Mudbox

Image
 In todays lesson we focused on hard surface sculpting in Mudbox. In order to experiment with this form of sculpting I used the premade Mudbox human body mesh. 

Life Drawing 17/03/22

Image
 

Toolkit 2: Revisiting The Animation Process

Find a reference video clip and attempt to recreate the characters actions while also applying what you know about the character you are modelling. If they are a cartoon character, exaggerate the nuances, if they are realistic, strip back on the nuances  Block-out animation. secondary animation, face, fingers and clothing. You want to get as many pass throughs as time will allow in order to make sure the animation looks the best it can. This is revisiting the animation and tweaking it with subtle details so that it looks natural.  Do a quick block-out of the scene so that it matches with the video you are referencing. Next pose the character in the scene for the starting frame.  Create the cameras for the shots and frame up each shot of the video reference. Each shot will help you to determine what the character needs to be doing for each shot. Try and think about what is going on outside of the camera shot to help with positioning the character. It helps to look at other...

Premise: Full Palace Concept

Image
 Today I took all of the elements I had created and remade my initial concept in the front view.  I am happy with the outcome of my drawing and feel I have been able to successfully translate the initial ideas I had into a fully realised world which represents the traditional Japanese side.  I now want to take the ideas I have formed from constructing the traditional city and use them to make the cyberpunk world which is invading Japan. 

Premise: Japanese Architecture Orthographs

Image
 Today I continued drawing the front orthographs for the Japanese palace. I managed to construct the buildings by laying out different combinations of the rooftops I drew and connecting them with walls inspired by my references.  Although the buildings may look complicated they are all made up of the same rooftops and beams. For this reason it is not as much work as it looks and I feel I will be able to construct a detailed environment without spending too much time. This is important as my main focus is animation. 

Premise: Rooftop Orthographs For Traditional City

Image
 Today I wanted to begin the final design for the Japanese palace which will be the backdrop of the fight scene. I gathered images to reference for the placement of the buildings as well as using my own sketch. When finding references I kept my character in mind at all times. This is because it is important to create a world which defines the main character as a product of his environment.  I decided to start with the front view of the buildings so that I could get a clear understanding of Japanese architecture. I found that the rooftops are the most defining factor in making a building unique and so experimented with different designs. As I have done the images in the front view I can also use these drawings a orthographs later when it comes to the 3D modelling process. 

Premise: Fight Sequence

Image
 I like the dynamic between Spike and Vicious, which is something I want to incorporate into my fight scene. By having both fighters follow a code of honour, it allows their fight to flow with this idea in mind. I need to identify the moral code my characters follow in order to create a foundation for the fight. I will then be able to determine the actions they would take, given a situation. The idea of my project is traditional vs technology, which is a theme that I want to be prominent in the world building and character design. In order to depict mans fall to machinery, I want my two characters to be fighting over some sort of object which is the key to granting the user immortality. This is mans last stand against machine and so I want this desperation to be depicted in the action of the Samurai. Is he willing to break his moral code in order to win? At the same time the cyberpunk side is also desperate to win however this will be depicted in a very different light as the chara...

Premise: Investigating Cowboy Bebop + Fight Scenes

Image
Moving forward I need to construct a storyboard which display the events which will take place within the action sequence. From the brief I know that the animation has to be between 2-4 minutes long. I know that I want to show off the battle between traditional and technology, through the use of Japanese culture and the cyberpunk genre. With two characters as the focus point, I want to display a confrontation between the two sides, with movement as the focus. My aim is to create two characters which are products of their environments and then tell their story through their movement and actions in the world.   After looking at previous students work, I saw that someone had done a fight scene between two characters. I really like this idea as to me this is the best part of a story. Two characters have finally confronted each other after going through the trails and tabulations of the story. Its all building up to this moment. Their are so many factors to consider, such as where ...

Toolkit 2: Skinning Jetpack Jones - Adding Pose Space Deformers For The Upper And Lower Body

Image
     I r efined the weights by using the smooth tool on the upper, lower and mid spine as well as pelvis and chest. In todays video I used the pose editor in order to clean up the geometry around the joints, so that the geometry would move in an appropriate way when the joint is rotated. I added animation to help with this process so that I could see the joint moving at different angles.

Toolkit 2: Skinning Jetpack Jones - Blending The Upper And Lower Body

Image
Now that I have weighted the mesh I now needed to distribute that weight in the appropriate areas so that only the correct movement happened when moving a joint  After following along with the video to paint the weights for the pinkie, I then did the rest of the fingers on my own using the same method. The method was simple enough to complete for each finger, however I ran into a problem with some of the fingers where the weights had been placed in the wrong areas. At first I was unsure how to fix this problem so I messed around with the settings for a while. Eventually I remembered that you just have to repaint the weight for the right finger and then flood it 100% I then continued to use the same process for the rest of the top half of the model.  I also completed the second video which shows you how to paint the weights for the lower half of the model.  Once the entire model had been weighted I mirrored over the weighting to the right hand side.