Posts

Showing posts from November, 2022

Minor Project: Improvements Needed For Characters Designs + Investigating 3D Samurai Models

Image
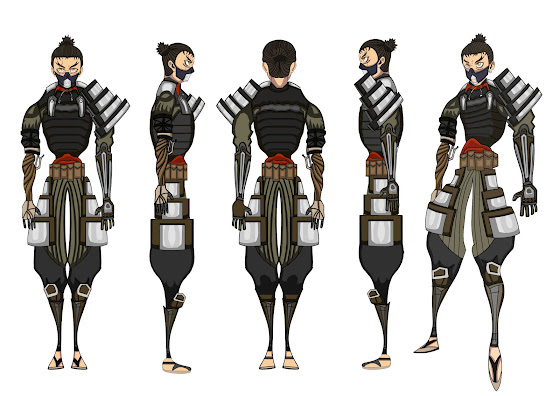
 After showing off the 3D models of my characters to both my Tutors they explained that.. I need to firstly find out whether the armour I'm modelling is accurate both in the direction the armour panels are facing and the way the armour fits the character. It is essential to understanding how everything comes together in 3D if you understand how the armour works in real life.  There are also things such as what will need to be modelled and what I can get away with just texturing in substance painter, which I did not consider. I firstly need to identify the materials I will be using to then understand what needs to be modelled and what can be left up to the texturing faze. As well as this my Samurai character has exposed shoes so you can see his toes. I was advised that If I want to make my life easier when it comes to animation, I should just give him boots which cover his feet. Therefore there is less to consider when animating. This is the sort of thing I never considered when des

Minor Project: Investigating Environment + Revised Layout Of Map

Image
 Now that I have completed the revised animatic, I now want to begin creating the environment in 3D. However I want to go about doing this in a different way compared to last year, when I modelled the environment for the pre-viz. For the pre-viz I ended up modelling the entire environment as one big model, which allowed me to visualize the animation from my drawings, however made it hard to get certain shots to work. It also made the modelling process more confusing for me as I had to make the environment suitable for the story but also match the drawings (which didn't fit perfectly together).  Instead of doing the same thing for the revised environment, I decided to take a step back and firstly understand how the environment is used within the animation. I did this by collecting every shot where the environment is present within the animatic.  Now that I had gathered each shot and placed them side by side, I could then piece together my environment a lot more clearly in my head. A

Minor Project: Modelling The Cyberpunk Characters Head

Image
 In order to make the cyberpunk characters head, I first looked up any tutorials which could possibly help so that I could visualize how to model the character. The head is probably the most complicated part of this character and the most important, so I wanted it to look good.  The main concept of the character is that the human side has been drained by the technology and so as a result it resembles a skeleton. For this reason I decided to look up skull modelling tutorials.  I found this tutorial which I followed for a bit in order to get the basic outline of the characters head. I could then change it to look the way I wanted it to look.  Overall I am happy with the model and feel I have capture the basic look of the character. I want to tighten up this model so that it looks less organic and more hard surface. I think at the moment the character looks a bit soft, especially the parts which are meant to be metal, so I will go back over the character. With that being said I am proud t

Minor Project: Modelling The Samurai Characters Body

Image
 In order to make the body for the Samurai, I firstly re-watched the Jetpack Jones video tutorials in order to get a refresher. This showed me the process of making a characters body in 3D. I then applied the same logic to my own characters design.  It was an interesting experience taking something you have drawn and making it make sense in a 3D format. I found that certain parts had to be tweaked in order to work in 3D. I ended up leaving the body at an earlier stage in order to ask if this method of creating the character is good and what I should be doing in order to model in the correct way. 

Minor Project: Final Animatic With Transitions

Image
 Today I put the animatic storyboard into Premiere Pro and created the final animatic.  I am really happy with the final look of the animatic and feel confident making this into a 3D animation. I didn't realize how much I left out when comparing the two versions of the animatic for last year. Even now I feel I can still add more, however I want to move on to the 3D modelling first in order to see how it translates to 3D. The movement is a lot better and it is actually clear what is going on between the two. Referencing the fight scenes helped a lot in order to do this. The compositions also help to present the whole thing in a clearer way.  There is still more I need to research, such as camera lenses and depth of field. I will look at this next in order to make sure I am presenting my animation in the best way. I feel like the only other thing I could do to make the animatic seem more clear is by adding sound effects. However I will not do this until a later stage after doing some

Minor Project: Final Version Of Animatic Storyboard

Image
 Today I finished the animatic storyboard by redrawing the images to be a better quality. I colour coded the two characters in order to make it easier to follow, with green being the Samurai and red being the cyberpunk character. I tried my best to come up with a storyline which would both show off the two characters, the world and my animation skills, while still fitting within the allocated time. I also did not want to overcomplicate the characters movements as I knew whatever I planned to do had to be recreated in 3D. Some of the frames may still seem a bit unclear within the drawings, however I am hoping to fix this within the editing side, which I will be doing next.  Overall I feel this is a massive improvement over what I already had and will help me to plan out the pre-viz in a much more detailed way. I plan on editing everything together before moving on to the pre-viz, just to make sure I have enough shots, however I don't want to make the animation too long. 

Minor Project: Modelling Samurai Character Head In 3D (Version 2)

Image
After completing the other tutorial an realising that the character head was too realistic for the Samurai design, I searched for a different tutorial online.  This video had an interesting method for modelling faces in 3D. You start by making the basic outline of your character in 2D and then move all of the vertex's out to make the model 3D. This was a strange method but meant that my character was even more accurate to the drawing.   By then end of the video I felt that I had created a head which was a lot closer to the drawing I had done. The video did not cover how to do the back of the head as the character in the video has long hair which covered this. I will need to do this next. 

Minor Project: Creating Rough Animatic - 3

Image
 Today I was able to finish the rough version of the animatic. I feel that this version of the animatic is far superior as it contains more detailed character movements as well as more interesting camera angles. I really tried to thing of how I want the audience to see the events unfold and how this could be done in the most efficient way (keeping in mind the time restriction on the brief).  It was hard at first for me to do really rough drawings instead of spending the time to make them look nice, however as I got further along and could see the movement taking place within the rough drawings, I was able to continue and finish everything. I'm excited to see how my ideas transfer to the final thing as I can already see my ideas working within the rough drawings. 

Minor Project: Creating Rough Animatic - 2

Image
 Today I continued creating the storyboards for my animatic. I was able to incorporate the key comps I had created in order to give a rough outline of the events which would take place and then add in additional frames for context. For certain sections I could also reuse parts of the original animatic which I felt depicted the story well. 

Minor Project: Following 3D Head Tutorial

Image
 In order to begin the 3D side of the project, I started by firstly researching videos on YouTube which I could use to help with some of the models. I also thought it was important to just watch videos on Maya in general in order to see other people work flows and as a way to discover new tools I could use in Maya.  I found the video below which shows how to model a human head, which I could use to help with my Samurai character.  Even if I didn't end up using the model I had made, I still wanted to see how someone else models a head as I have only done it a handful of times and I want to find the most efficient way which works for me.   I found the video to be very detailed and it helped me with understanding topology to a point, however certain steps taken in order to get to the final product differed from what I had been taught, which confused me when I got to the end of the video.  The example image show what the character should have looked like if I continued to follow the tu

Minor Project: Rough Animatic 1

Image
 Today I began my rough storyboard for my new fight scene animatic. I used all of what I learned from my research on how to do a fight scene animatic as well as my references of shots I liked from fight scenes. I did my best to keep the drawings rough and to draw zoomed out so that I could animate with my eyes.