Posts

Showing posts from October, 2020

Getting Used To Animation: Morph Task (Finnished)

Image
 After completing the face to mushroom morph, I continued to work on the animation for the rest of the week. The final results are below. I really pleased with how the animation turned out and I feel like you can clearly see my skills with the animation software improve as the animation goes on. After completing the face to mushroom morph, I felt I needed to not only speed up the process but also look to morph the facial features in a more interesting way. I managed to drastically speed up the process of the mushroom to elephant morph by animating the mushroom until it was in line with the elephant, and then copy and pasting my drawing, adding small changes with each image. This meant I didn't have to draw the whole image again and could focus on the changes. Another important thing I learnt from using the software was it didn't really matter what your drawing looked like. I was spending far too long on a single drawing, which will not be seen for long. Unless there was a glari...

Intro To Photoshop: Editing Photos

Image
  Todays lesson focused mainly on the different types of selection tools in photoshop. Before starting the task we went through all of the different types of selection tools to see how they all varied and what they are best used for. Selection tools are really good for isolating a certain part of an image to edit or deleted separately to the whole image. Once you are done with a selection you can click ctrl + D to deselect the object in the image.  With first image the goal was to select the dress only, so that we could create a clipping mask and change the colour of it. This is used a lot in the fashion industry to show different coloured versions of the same product quickly. We firstly use the quick selection tool to roughly select as much of the dress as we could. It did not matter if you slightly went over or under the line as this would be fixed after. With the selection tool still selected, you click on select and mask on the top of the screen. This isolates the selected...

Animation: Pendulum, Timing And Spacing

Image
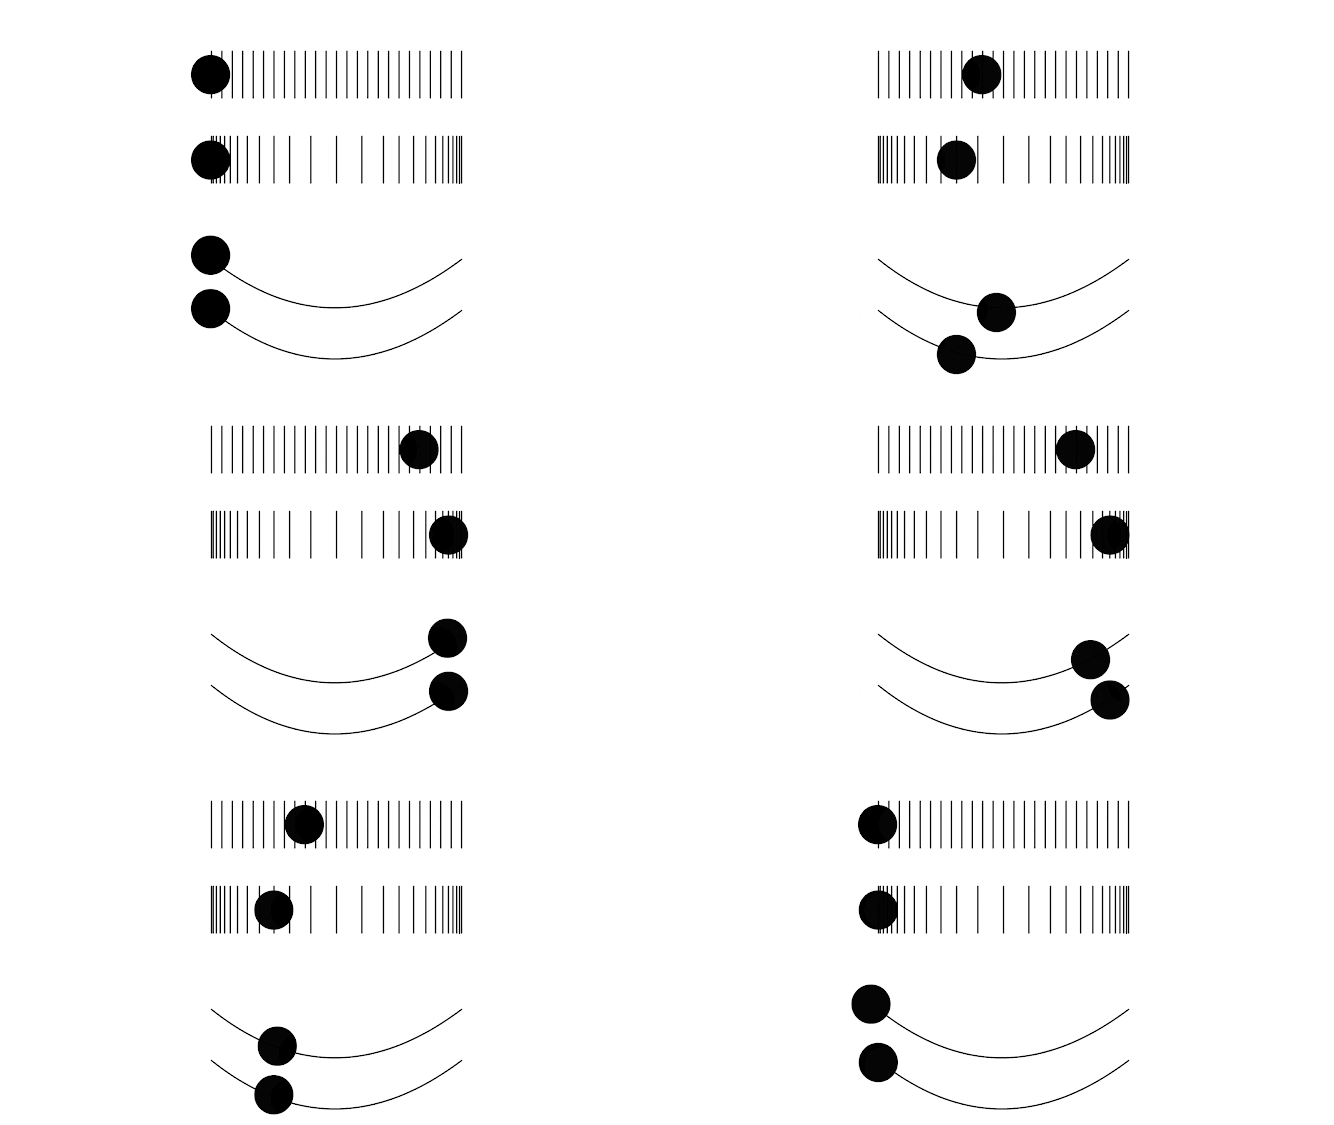
  Today we completed the pendulum task in order to understand timing and spacing within animation. The idea of this task is that you draw in the guidelines so that each ball is moving the same distance and meeting at the beginning middle and end, however the progression of each ball is different due to the guides having different middle sections. The top image shows a ball moving across in spaced increments and the one below it show the ball moving across in ease in/ ease out increments. The timing of each ball is the same, however the spacing is varied.  I found this task a lot easier compared to the morph task as there were guidelines for this animation. Whereas the morph task was very open to interpretation, this task had a straightforward goal. This task made me feel really comfortable using the F key shortcuts, which I used to complete the previous task however do not feel like I utilized properly. I am happy with the results however feel as though the firs...

Getting Used To Animation: The Morph Task (Face to Mushroom)

Image
After speaking to Nat and looking at how she did her animation loop, I felt more confident at completing my one. I also asked other students, if they were struggling with the task and asked to see what the had done so far. One person suggested if I continued to struggle with drawing from the middle, just to draw from the beginning, using the onion skin to see the image you are working towards and the previous drawing. This method seemed easier to me as it meant you could minor changes to the image instead of guessing what it should look like.                           After attempting the middle image method, I decided just to draw the image from the beginning. I felt like I was wasting time and knew I would get the same results regardless of how I completed the task. I just needed to choose the method that worked for me.   I preferred using this method to create my animation as you could see the progress yo...

Intro to Maya: Lego Car

Image
 For our fist asset in Maya, we were task with making a Lego car which will eventually get textured and animated.  The way this is done is by first making the single block asset. The rest of the blocks are then made from this asset, moving the pivot point and mirroring the block. This process is easy enough to do and not only speeds up the overall process but also ensure all assets are the same size. 

Life Drawing

Image
 This was my fist experience drawing a live model in the life drawing class. Although I was nervous before the lesson, I was also excited to learn more about the human form.  We were first tasked with some quick drawing exercise to warm up and to also give us new ideas of how to approach a drawing. The image to the far left had to be drawn in 30 seconds and the image to the left in 60. This task forced us to be more observant as we didn't have time to switch between drawing and looking at the model, we had to do both at once. I struggled with this at first as I was overthinking the task, causing me to draw a minimal amount, however felt as though me second attempt was much better. We were then tasked with drawing the next two images with our opposite drawing hand. This meant for me drawing the images with my right hand as I am left handed. Although this task sounded daunting at first, I found the results to be better than I expected. This task teaches you to allow yourself to ...

Intro To Photoshop

Image
 Today we had our first lesson in using photoshop. I have a small amount of experience using photoshop, however I don't feel very confident using it. For our first task we were simply asked to resize and place the cupcake images on the line. This could be done using the transform tool, which is applied when an image is selected and ctrl + T is presses. This puts a box around the image which then allows you to manipulate its size and rotation. This was easy enough to do and served as a nice recap.  Next we took an image of a gorilla and were told to adjust its brightness to make it more clear. One way of doing this (and the way I probably would have done it before) is by clicking the image tab, finding adjustments and then clicking on brightness/contrast. This then enables you to move the sliders the edit the image. However the problem with this is that you are changing the original image, meaning you are unable to go back if you find you don't like the results.  Instead o...

Getting Used to Animation: Animation Morph Task (Update)

Image
When referring back to the three images I had drawn, I decided that there was something off about my self portrait, so I decided to play around with the scale tool to see if I could make it look better                                 Original                                                                 New The main change was to the neck, but I also changed the size of the nose slightly and made the edges rounder. I think these changes improved the original image. After making changes to the images, I then began to animate. As stated on the brief, its much easier to morph something if you start with the middle frame between the two. You then draw the middle frame between the middle and repeat this process moving outwards. A...

Intro To Maya

 Today we were introduced to the software Maya, which we will be using to create and animate 3D objects and environments. As I previously completed a Video games art and production course at Midkent College in Maidstone, I had used Maya for the past two years. It was however nice to get a refresher of all the tools since I had not used it for a while. I took notes on tools I had not used before which include: F keys - Which shift through the dropdown menus (Modelling, Animation, Rigging) F1 - This is a really useful key which I previously did not know about. It takes you to the official Maya help menu made by Autodesk, where you can search for any issues you may be having to find a solution. This is going to be a very useful tool as we progress further into the course.

Getting Used To Animation: The Morph Task

Image
For our first animation lesson with Nat, we were tasked with creating a 3 second animation loop using the software Adobe Animate. The animation had to be digitally drawn and consisted of our self portrait morphing into a distinguishable item of food, then to a distinguishable animal and then back to our self portrait (this is what creates the loop). Before starting we were given helpful shortcut keys which would be needed to complete the task.  Ctrl + 2  - This center's the frame, allowing you to quickly see the drawing as a whole.  B -  This changes the cursor to the brush tool .This is what you use in animate to draw your animations. V - Changes the selected tool back to cursor, allowing you to select objects in the frame E - This switches the selected tool to the Eraser, Allowing you to correct things in the drawing F5 - This holds the frame you are currently working on and allows you to reuse it for as long as you want. Changes can be seen on the timeline. F6 - T...